Oyoxo - Heating Air-conditioning Services HTML Template
Documentation
- Welcome
- Installation
- HTML Structure
- Change Images
- Logo
- Icons
- CSS Files
- JavaScript Files
- PHP Contact form
- Mailchimp News Letter
- Rate this template
Template Name: Oyoxo
Author: Thememarch
Version: 1.2
Last Update: 6 may 2019
Thank you very much for purchasing the template. We've put a lot of hard work into it, and we hope you love it as much as we do. As far as the documentation is concerned, we have tried to cover as much as possible to help you get your new template up and running and to help you customise it. If you have any questions that are beyond the scope of this help file, please feel free to drop us an email. Thanks so much!
Installation
To install Oyoxo on your web server, download the files from Themeforest and unzip them to the
local disk on
your computer. Inside the extracted folder you will see three folders named
Documentation, oyoxo and oyoxo-rtl.
oyoxo folder structure is as follows:
- assets
- css - contains all vendor and custom css files
- fonts - contains icon fonts
- images - contains all images used in the template
- js - contains all vendor and custom js files
- php - contains all PHP files
- json - contains all json files
- scss - contains all scss files
- index.html - Home Page
- index-2.html - Home Page without heroslider background shape
- blog.html - Blog Grid Page
- blog-leftsidebar.html - Blog Grid Page with Left Sidebar
- blog-details.html - Blog Details Page
- blog-details-leftsidebar.html - Blog Details Page with Left Sidebar
- blog-details-gallery.html - Blog Details Page Gallery Post
- blog-details-audio.html - Blog Details Page Audio Post
- blog-details-video.html - Blog Details Page Video Post
- shop.html - Product Grid Page
- shop-leftsidebar.html - Product Grid Page with Left Sidebar
- product-details.html - Product Details Page
- product-details-leftsidebar.html - Product Details Page with Left Sidebar
- cart.html - Shopping Cart Page
- wishlist.html - Product Wishlist Page
- checkout.html - Product Checkout Page
- my-account.html - My Account Page
- login-register.html - Login & Register Page
Using an FTP Client (such as Filezilla or Total Commander), you will need to upload all of the contents of the chosen folder to your server.
HTML Structure
This template is based on a responsive and full screen layout. And it's built using HTML5 standards.
index.htmlFrom beginning of the <body> tag till the ending
</body> tag, all the
codes and texts are used for the template structure. You can change any text from the
template by navigating
through the index.html file and localizing each line of text you want to
change.
Like index.html, you can change any page included with this template starting
from <body>
tag till ending </body> tag.
Change Placeholder Images
When you download the template files you will see we used placholder images instead of those originals we used in our preview link. To change with your desired images replace the placeholder images.
Logo
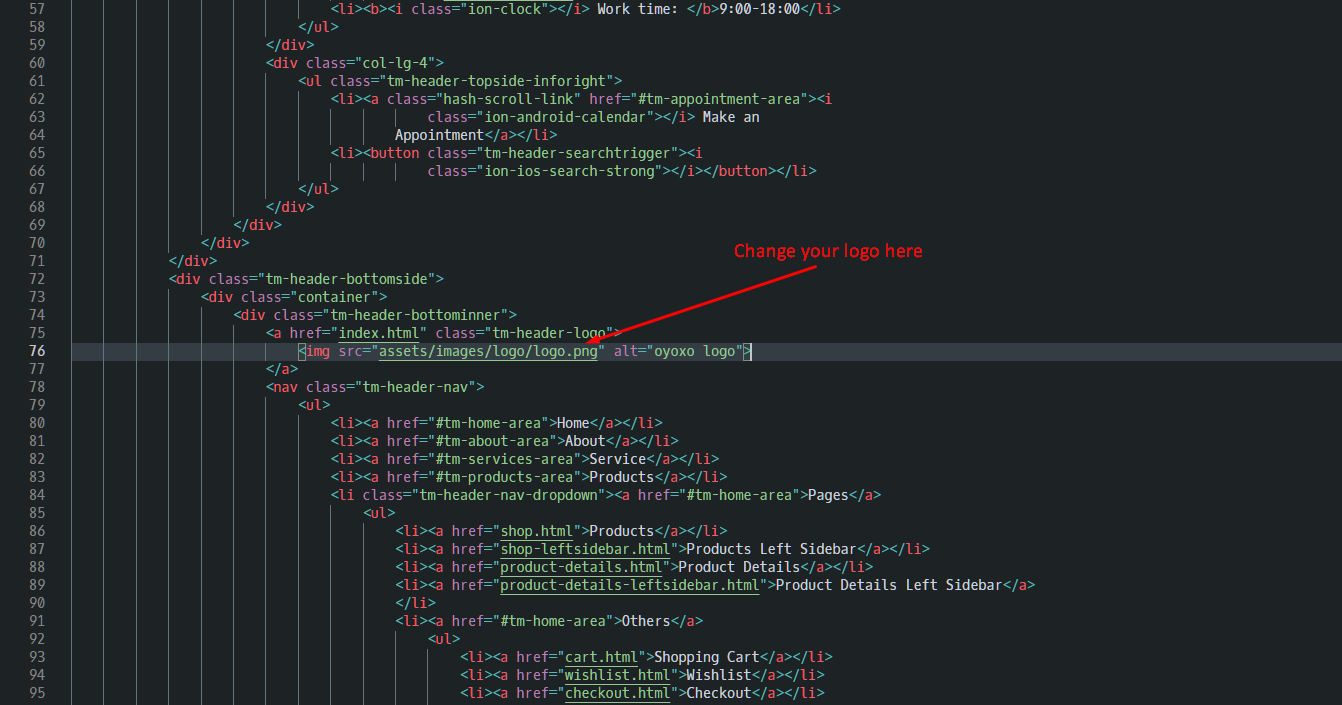
We use Default logo as a image logo. If you want to use text instead of logo, just remove the
image and add
your text inside <h2>YOUR_TEXT</h2>
Icons
We used two type of font icons in this template.
- Ionicons V2
Ionicons V2
List of all icons with their classes is here.
Example use with class "ion-search": <i
class="ion-search"></i>
CSS Files
All the css files are located in the css folder of the template.
style.css - Main stylesheet which includes all the styles of the template.
JavaScript Files
All vendor, 3rd party plugin and our custom JavaScript files are located in the
js folder.
plugins.js - Includes all 3rd party plugins in the template.
main.js - Our custom JavaScript file. You can add your custom js codes there if
you need to.
Please DO NOT edit this files unless you have JavaScript coding experience. Simple mistakes can cause serious damage to the scripts
PHP Contact Form
Our contact form is totally functional, after submit form you can see form data on your
E-mail.
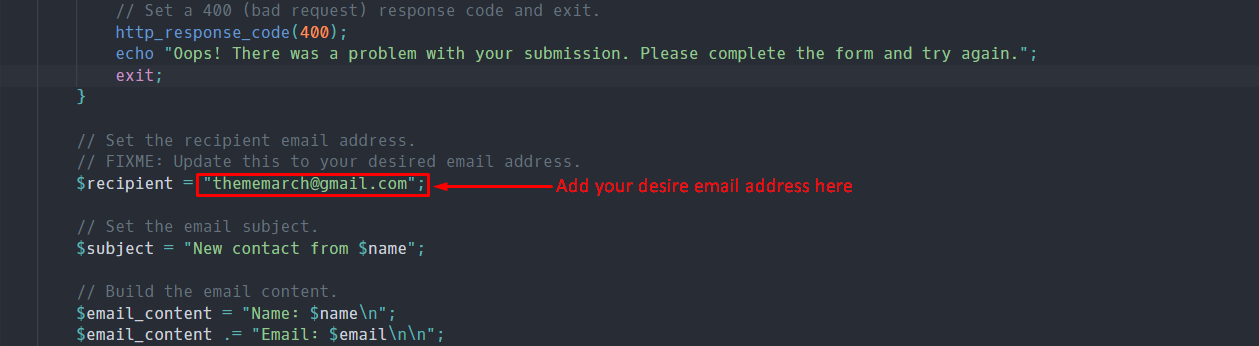
You just go to php folder, In side php folder you can see mailer.php file, open it and just
change email address
like Image.
Mailchimp News Letter
Our Mailchimp News Letter is completely functional, When you click subscribe button the email
address is
stored
your mailchimp profile.
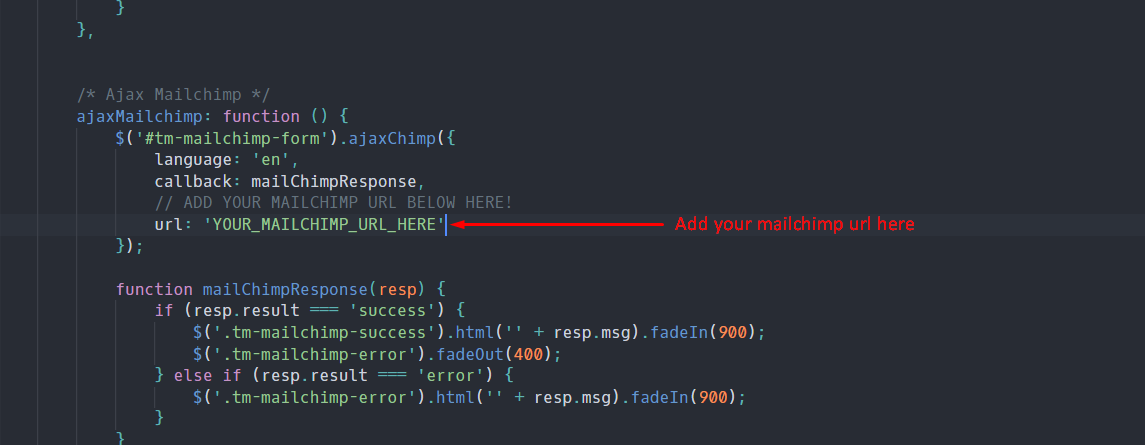
You just go to js folder and open main.js file. Add mailchimp link on this file like image.
Sources and credits
Image Credits:
jQuery Plugins:
Rate This Template
If you like this template, please remember to rate it on ThemeForest - it really helps us to know what people think of our templates. To rate this item, go to your Downloads page on ThemeForest, then next to this template give it the five star rating :)

We would love to hear your feedback. If you find any bugs or have suggestions for improvements please get in touch. Nearly all of the time we follow your advice and issue a rapid update.